Android實(shí)現(xiàn)三角形氣泡效果方式匯總
在開發(fā)過程中,我們可能會經(jīng)常遇到這樣的需求樣式:
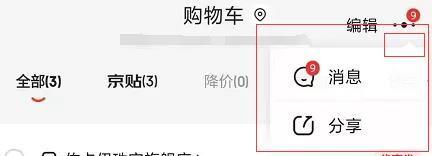
這張圖是截取京東消息通知的彈出框,我們可以看到右上方有個(gè)三角形的氣泡效果,這只是其中一種,三角形的方向還可以是上、下、左、右。
通過截圖可以發(fā)現(xiàn),氣泡由正三角形和圓角長方形組成,于是可以通過組合來形成三角形氣泡的效果,下面我們通過三種方式進(jìn)行實(shí)現(xiàn)。
實(shí)現(xiàn)方式:
1、通過.9圖進(jìn)行實(shí)現(xiàn);2、通過shape方式實(shí)現(xiàn);3、通過自定義view的方式實(shí)現(xiàn);
實(shí)現(xiàn)邏輯:1、通過.9圖進(jìn)行實(shí)現(xiàn)
這種方式就不用說了吧,找你們UI小姐姐切一個(gè).9圖,使用即可,不過這種方式的圖片需要占一定體積哦。
2、通過shape方式實(shí)現(xiàn)
正三角形
<?xml version='1.0' encoding='utf-8'?><layer-list xmlns:android='http://schemas.android.com/apk/res/android'> <item> <rotate android:fromDegrees='45' android:pivotX='-40%' android:pivotY='80%'> <shape android:shape='rectangle'><size android: android: /><solid android:color='#ffffff' /> </shape> </rotate> </item></layer-list>
倒三角形
<?xml version='1.0' encoding='utf-8'?><layer-list xmlns:android='http://schemas.android.com/apk/res/android'> <item> <rotate android:fromDegrees='45' android:pivotX='135%' android:pivotY='15%'> <shape android:shape='rectangle'><size android: android: /><solid android:color='#ffffff' /> </shape> </rotate> </item></layer-list>
左三角形
<?xml version='1.0' encoding='utf-8'?><layer-list xmlns:android='http://schemas.android.com/apk/res/android'> <item> <rotate android:fromDegrees='-45' android:pivotX='85%' android:pivotY='-35%'>> <shape android:shape='rectangle'><size android: android: /><solid android:color='#ffffff' /> </shape> </rotate> </item></layer-list>
右三角形
<?xml version='1.0' encoding='utf-8'?><layer-list xmlns:android='http://schemas.android.com/apk/res/android'> <item> <rotate android:fromDegrees='-45' android:pivotX='15%' android:pivotY='135%'>> <shape android:shape='rectangle'><size android: android: /><solid android:color='#ffffff' /> </shape> </rotate> </item></layer-list>
上面就是通過shape方式實(shí)現(xiàn)各個(gè)方向的代碼,這種方式缺點(diǎn)比較明顯,如果要變化不同的角的位置需要再寫不同的布局。
3、通過自定義view的方式實(shí)現(xiàn)
由于是比較簡單這里就不講解每個(gè)怎么搞了,可以復(fù)制過去直接用
添加自定義屬性
<declare-styleable name='TriangleView'> <attr name='trv_color' format='color' /> <attr name='trv_direction'> <enum name='top' value='0' /> <enum name='bottom' value='1' /> <enum name='right' value='2' /> <enum name='left' value='3' /> </attr> </declare-styleable>
自定義代碼文件
public class TriangleView extends View { private static final int TOP = 0; private static final int BOTTOM = 1; private static final int RIGHT = 2; private static final int LEFT = 3; private static final int DEFUALT_WIDTH = 10; private static final int DEFUALT_HEIGHT = 6; private static final int DEFUALT_COLOR = R.color.FFF; private Paint mPaint; private int mColor; private int mWidth; private int mHeight; private int mDirection; private Path mPath; public TriangleView(final Context context) { this(context, null); } public TriangleView(Context context, @Nullable AttributeSet attrs) { this(context, attrs, 0); } public TriangleView(final Context context, final AttributeSet attrs, final int defStyleAttr) { super(context, attrs, defStyleAttr); init(); TypedArray typedArray = context.getTheme().obtainStyledAttributes(attrs, R.styleable.TriangleView, 0, 0); mColor = typedArray.getColor(R.styleable.TriangleView_trv_color, ContextCompat.getColor(getContext(), DEFUALT_COLOR)); mDirection = typedArray.getInt(R.styleable.TriangleView_trv_direction, mDirection); typedArray.recycle(); mPaint.setColor(mColor); } private void init() { mPaint = new Paint(); mPaint.setAntiAlias(true); mPaint.setStyle(Paint.Style.FILL); mPath = new Path(); mDirection = TOP; } @Override protected void onMeasure(int widthMeasureSpec, int heightMeasureSpec) { super.onMeasure(widthMeasureSpec, heightMeasureSpec); mWidth = MeasureSpec.getSize(widthMeasureSpec); mHeight = MeasureSpec.getSize(heightMeasureSpec); final int widthMode = MeasureSpec.getMode(widthMeasureSpec); final int heightMode = MeasureSpec.getMode(heightMeasureSpec); if (mWidth == 0 || widthMode != MeasureSpec.EXACTLY) { mWidth = (int) PixelUtil.dp2px(DEFUALT_WIDTH); } if (mHeight == 0 || heightMode != MeasureSpec.EXACTLY) { mHeight = (int) PixelUtil.dp2px(DEFUALT_HEIGHT); } setMeasuredDimension(mWidth, mHeight); } @Override protected void onDraw(Canvas canvas) { super.onDraw(canvas); switch (mDirection) { case TOP:mPath.moveTo(0, mHeight);mPath.lineTo(mWidth, mHeight);mPath.lineTo(mWidth / 2, 0);break; case BOTTOM:mPath.moveTo(0, 0);mPath.lineTo(mWidth / 2, mHeight);mPath.lineTo(mWidth, 0);break; case RIGHT:mPath.moveTo(0, 0);mPath.lineTo(0, mHeight);mPath.lineTo(mWidth, mHeight / 2);break; case LEFT:mPath.moveTo(0, mHeight / 2);mPath.lineTo(mWidth, mHeight);mPath.lineTo(mWidth, 0);break; default:break; } mPath.close(); canvas.drawPath(mPath, mPaint); }}
布局文件添加
<com.sjl.keeplive.triange.TriangleView android:layout_width='10dp' android:layout_height='6dp' app:trv_color='@color/FFF' app:trv_direction='top' />
通過自定義的方式可以搞定四個(gè)方向,而且在代碼中也可以使用,動態(tài)添加,動態(tài)改變顏色,還是比較好的方式。
到此這篇關(guān)于Android實(shí)現(xiàn)三角形氣泡效果方式匯總的文章就介紹到這了,更多相關(guān)Android 三角形氣泡 內(nèi)容請搜索好吧啦網(wǎng)以前的文章或繼續(xù)瀏覽下面的相關(guān)文章希望大家以后多多支持好吧啦網(wǎng)!
相關(guān)文章:
1. CSS清除浮動方法匯總2. js開發(fā)中的頁面、屏幕、瀏覽器的位置原理(高度寬度)說明講解(附圖)3. HTML5實(shí)戰(zhàn)與剖析之觸摸事件(touchstart、touchmove和touchend)4. CSS百分比padding制作圖片自適應(yīng)布局5. vue跳轉(zhuǎn)頁面常用的幾種方法匯總6. 不要在HTML中濫用div7. XML入門的常見問題(三)8. CSS3實(shí)例分享之多重背景的實(shí)現(xiàn)(Multiple backgrounds)9. 深入了解React中的合成事件10. TypeScript實(shí)現(xiàn)十大排序算法之歸并排序示例詳解

 網(wǎng)公網(wǎng)安備