基于Android studio3.6的JNI教程之ncnn人臉檢測(cè)mtcnn功能
代碼鏈接:
https://github.com/watersink/mtcnn-linux-as
本代碼可以在模擬器下進(jìn)行跑。
環(huán)境:
windows10
Android studio 3.6
Sdk:android10 api 29
Ndk:r15c
Ncnn:20200226
Linux下的代碼測(cè)試:
cd mtcnn_linux/buildcmake ..make./mtcnn
如果可以跑通,輸出正確結(jié)果,證明mtcnn代碼的準(zhǔn)確性。
實(shí)際操作的時(shí)候,首先基于linux把c++代碼調(diào)試通,方便后續(xù)的android調(diào)試。
Android進(jìn)行c++調(diào)試時(shí),使用__android_log_print函數(shù)進(jìn)行l(wèi)og的輸出,
開發(fā):
(1)工程建立
新建android工程,選擇Native C++,工程名為mtcnn,C++ Standard選擇c++11
(2)資源文件res修改:
src/main/res/drawable下面隨便復(fù)制一張帶有人臉的照片,比如這里,復(fù)制了一張beauty.png

src/main/res/layout下面新加main.xml。

詳細(xì)內(nèi)容,
<?xml version='1.0' encoding='utf-8'?><LinearLayout xmlns:android='http://schemas.android.com/apk/res/android' android:orientation='vertical' android:layout_width='fill_parent' android:layout_height='fill_parent'> <LinearLayout android:orientation='horizontal' android:layout_width='fill_parent' android:layout_height='wrap_content'> <Button android: android:layout_width='wrap_content' android:layout_height='wrap_content' android:text='選圖' /> <Button android: android:layout_width='wrap_content' android:layout_height='wrap_content' android:text='檢測(cè)' /> </LinearLayout> <TextView android: android:layout_width='fill_parent' android:layout_height='wrap_content' android:text='' /> <ImageView android: android:layout_width='fill_parent' android:layout_height='fill_parent' android:layout_weight='1' /></LinearLayout>
(3)增加ncnn的lib文件
src/main下面新加jniLibs文件夾,加入對(duì)應(yīng)平臺(tái)的libncnn.a

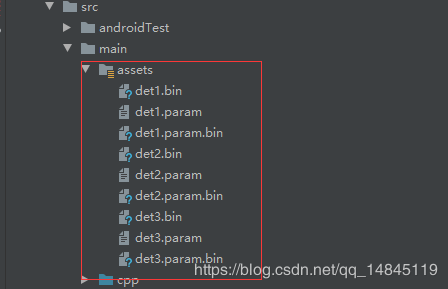
(4)增加網(wǎng)絡(luò)模型文件assets
在main下面新建assets文件夾,里面放入mtcnn的3個(gè)網(wǎng)絡(luò)結(jié)構(gòu)的模型文件。
(5)修改java文件,
修改src/main/java/com/example/mtcnn下面的MainActivity,
主要操作,包括在onCreate函數(shù)中對(duì)mtcnn這個(gè)類進(jìn)行初始化。然后監(jiān)聽buttonImage,buttonDetect按鈕,分別進(jìn)行實(shí)現(xiàn)。
然后在該路徑下增加MTCNN類,主要需要實(shí)現(xiàn)的方法如下,
package com.example.mtcnn; public class MTCNN { //人臉檢測(cè)模型導(dǎo)入 public native boolean FaceDetectionModelInit(byte[] det1_param, byte[] det1_bin, byte[] det2_param,byte[] det2_bin,byte[] det3_param,byte[] det3_bin); //人臉檢測(cè) public native int[] FaceDetect(byte[] imageDate, int imageWidth , int imageHeight, int imageChannel); public native int[] MaxFaceDetect(byte[] imageDate, int imageWidth , int imageHeight, int imageChannel); //人臉檢測(cè)模型反初始化 public native boolean FaceDetectionModelUnInit(); //檢測(cè)的最小人臉設(shè)置 public native boolean SetMinFaceSize(int minSize); //線程設(shè)置 public native boolean SetThreadsNumber(int threadsNumber); //循環(huán)測(cè)試次數(shù) public native boolean SetTimeCount(int timeCount); static { System.loadLibrary('mtcnn'); }}
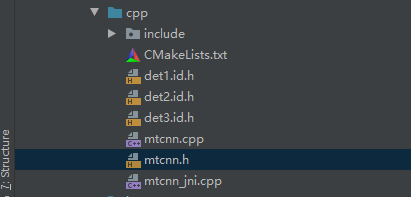
(6)修改cpp文件,
首先將ncnn的include文件夾包含進(jìn)來。
將模型的3個(gè)id.h文件包含進(jìn)來,det1.id.h,det2.id.h,det3.id.h
mtcnn_jni.cpp負(fù)責(zé)對(duì)人臉檢測(cè)的幾個(gè)native方法進(jìn)行實(shí)現(xiàn)。
mtcnn.h,mtcnn.cpp分別定義了一個(gè)MTCNN類,然后進(jìn)行了相關(guān)方法的實(shí)現(xiàn)。
需要注意,
這里讀取的模型文件是通過二進(jìn)制的方式讀取的assets下面的模型。所以模型文件一定要首先進(jìn)行加密處理(ncnn2mem)。
然后ncnn讀取加密后文件和未加密文件是有一些區(qū)別的。主要包含2個(gè)地方。
第一個(gè)區(qū)別就是導(dǎo)入模型的區(qū)別,詳細(xì)的用法看下圖。
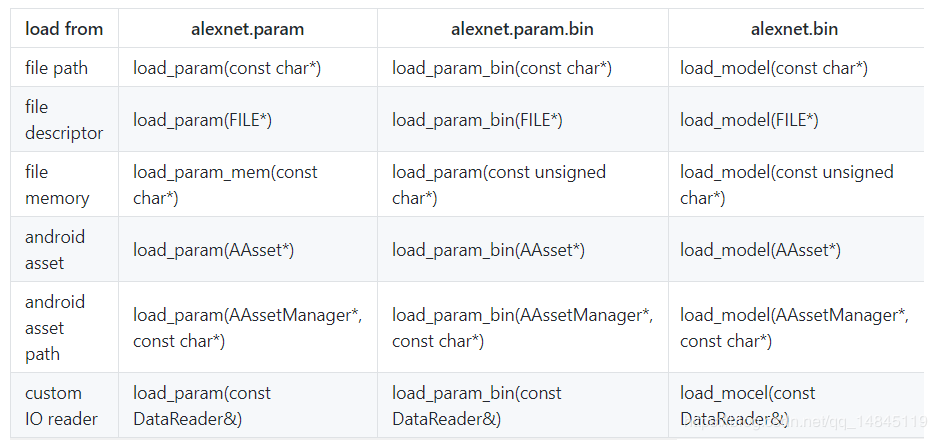
未加密的:
load_paramload_model
已經(jīng)加密的:
load_param_binload_model
如果使用load_param,load_model加載已經(jīng)加密的文件,返回值為讀取的字節(jié)數(shù)

其余情況下,正常加載模型會(huì)返回0,錯(cuò)誤返回其他值。
第二個(gè)區(qū)別就是,就是模型讀取輸入節(jié)點(diǎn)和輸出節(jié)點(diǎn)的區(qū)別,
未加密的:
ex.input('data', in);ncnn::Mat score_, location_;ex.extract('prob1', score_);ex.extract('conv4-2', location_);
已經(jīng)加密的:
ex.input(det1_param_id::BLOB_data, in);ncnn::Mat score_, location_;ex.extract(det1_param_id::BLOB_prob1, score_);ex.extract(det1_param_id::BLOB_conv4_2, location_);
(7)修改cpp下面的CMakeLists,增加ncnnlib的引用。
cmake_minimum_required(VERSION 3.4.1) #include頭文件目錄include_directories(include)#source directory源文件目錄file(GLOB MTCNN_SRC *.h *.cpp)set(MTCNN_COMPILE_CODE ${MTCNN_SRC})#添加ncnn庫(kù)add_library(libncnn STATIC IMPORTED )set_target_properties(libncnn PROPERTIES IMPORTED_LOCATION ${CMAKE_SOURCE_DIR}/../jniLibs/${ANDROID_ABI}/libncnn.a)#編譯為動(dòng)態(tài)庫(kù)add_library(mtcnn SHARED ${MTCNN_COMPILE_CODE})#添加工程所依賴的庫(kù)find_library( log-lib log )target_link_libraries( mtcnn libncnn android jnigraphics z ${log-lib} )
(8)修改app/build.gradle下, defaultConfig里面加入下面的代碼,
externalNativeBuild { cmake { arguments '-DANDROID_TOOLCHAIN=clang' cFlags '-fopenmp -O2 -fvisibility=hidden -fomit-frame-pointer -fstrict-aliasing -ffunction-sections -fdata-sections -ffast-math ' cppFlags '-fopenmp -O2 -fvisibility=hidden -fvisibility-inlines-hidden -fomit-frame-pointer -fstrict-aliasing -ffunction-sections -fdata-sections -ffast-math ' arguments '-DANDROID_STL=c++_shared', '-DANDROID_CPP_FEATURES=rtti exceptions' cppFlags '' cppFlags '-std=c++11' cppFlags '-frtti' cppFlags '-fexceptions' } } ndk { abiFilters ’armeabi-v7a’// , ’arm64-v8a’ //,’x86’, ’x86_64’, ’armeabi’ stl 'gnustl_static' }
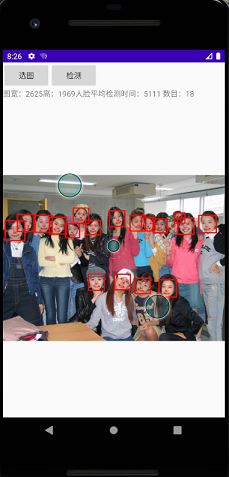
最終結(jié)果:
總結(jié)
到此這篇關(guān)于基于Android studio3.6的JNI教程之ncnn人臉檢測(cè)mtcnn功能的文章就介紹到這了,更多相關(guān)android studio3.6 ncnn人臉檢測(cè)mtcnn內(nèi)容請(qǐng)搜索好吧啦網(wǎng)以前的文章或繼續(xù)瀏覽下面的相關(guān)文章希望大家以后多多支持好吧啦網(wǎng)!
相關(guān)文章:
1. XML在語音合成中的應(yīng)用2. jscript與vbscript 操作XML元素屬性的代碼3. 不要在HTML中濫用div4. HTML5實(shí)戰(zhàn)與剖析之觸摸事件(touchstart、touchmove和touchend)5. .NET Framework各版本(.NET2.0 3.0 3.5 4.0)區(qū)別6. ASP基礎(chǔ)入門第四篇(腳本變量、函數(shù)、過程和條件語句)7. ASP將數(shù)字轉(zhuǎn)中文數(shù)字(大寫金額)的函數(shù)8. XML入門的常見問題(三)9. php使用正則驗(yàn)證密碼字段的復(fù)雜強(qiáng)度原理詳細(xì)講解 原創(chuàng)10. HTTP協(xié)議常用的請(qǐng)求頭和響應(yīng)頭響應(yīng)詳解說明(學(xué)習(xí))
 網(wǎng)公網(wǎng)安備