Springboot+Thymeleaf+Jpa實(shí)現(xiàn)登錄功能(附源碼)
最近有學(xué)習(xí)到關(guān)于Springboot+Thymeleaf+Jpa的綜合運(yùn)用知識(shí),因此想寫一個(gè)簡(jiǎn)單的登錄界面來(lái)嘗試一下,以下將展示具體流程
具體實(shí)現(xiàn)首先要?jiǎng)?chuàng)建一個(gè)springboot項(xiàng)目
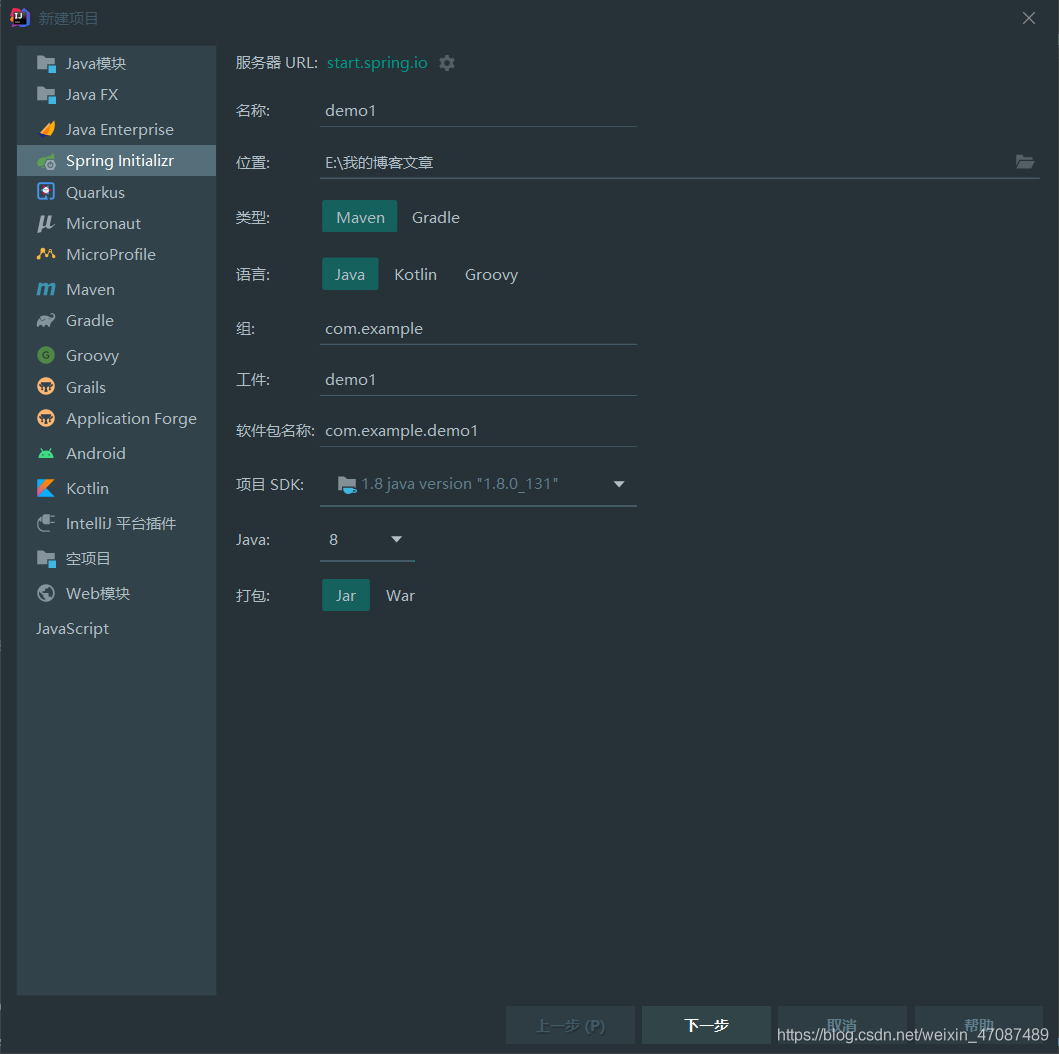
添加以下依賴項(xiàng)
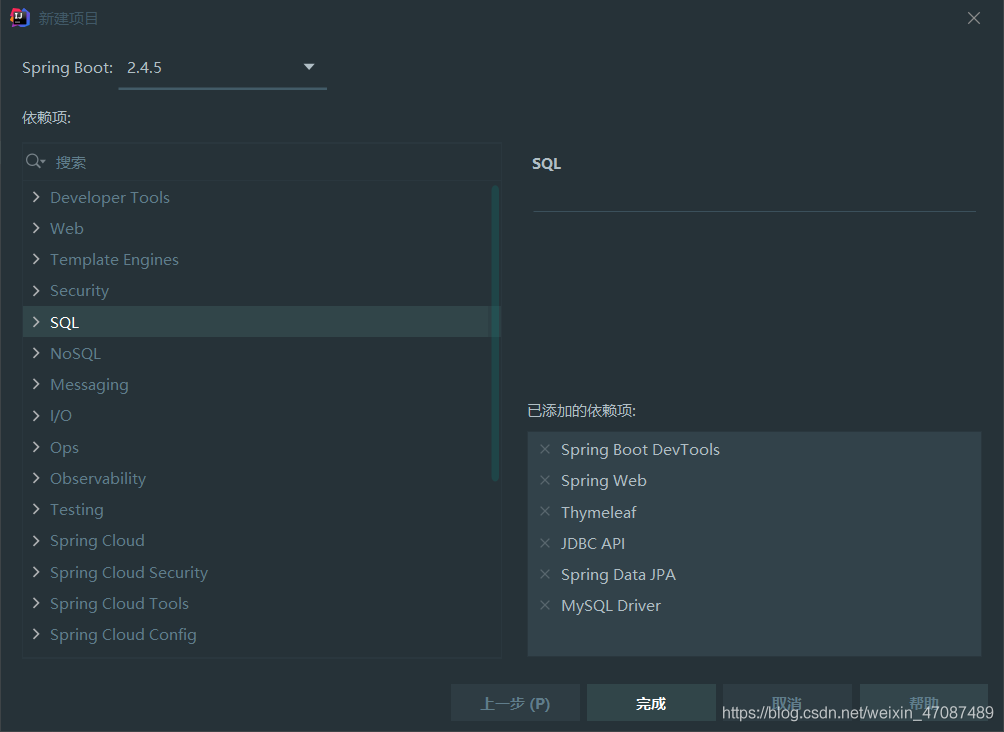
pom.xml代碼
<?xml version='1.0' encoding='UTF-8'?><project xmlns='http://maven.apache.org/POM/4.0.0' xmlns:xsi='http://www.w3.org/2001/XMLSchema-instance' xsi:schemaLocation='http://maven.apache.org/POM/4.0.0 https://maven.apache.org/xsd/maven-4.0.0.xsd'> <modelVersion>4.0.0</modelVersion> <parent><groupId>org.springframework.boot</groupId><artifactId>spring-boot-starter-parent</artifactId><version>2.4.5</version><relativePath/> <!-- lookup parent from repository --> </parent> <groupId>com.example</groupId> <artifactId>demo1</artifactId> <version>0.0.1-SNAPSHOT</version> <name>demo1</name> <description>Demo project for Spring Boot</description> <properties><java.version>1.8</java.version> </properties> <dependencies><dependency> <groupId>org.springframework.boot</groupId> <artifactId>spring-boot-starter-data-jpa</artifactId></dependency><dependency> <groupId>org.springframework.boot</groupId> <artifactId>spring-boot-starter-jdbc</artifactId></dependency><dependency> <groupId>org.springframework.boot</groupId> <artifactId>spring-boot-starter-thymeleaf</artifactId></dependency><dependency> <groupId>org.springframework.boot</groupId> <artifactId>spring-boot-starter-web</artifactId></dependency><dependency> <groupId>org.springframework.boot</groupId> <artifactId>spring-boot-devtools</artifactId> <scope>runtime</scope> <optional>true</optional></dependency><dependency> <groupId>mysql</groupId> <artifactId>mysql-connector-java</artifactId> <scope>runtime</scope></dependency><dependency> <groupId>org.springframework.boot</groupId> <artifactId>spring-boot-starter-test</artifactId> <scope>test</scope></dependency> </dependencies> <build><plugins> <plugin><groupId>org.springframework.boot</groupId><artifactId>spring-boot-maven-plugin</artifactId> </plugin></plugins> </build></project>配置文件application.yml的代碼
在mysql://localhost:3306/后更改為自己的數(shù)據(jù)庫(kù)名字,另外username和password同樣更改為自己數(shù)據(jù)庫(kù)的用戶名和密碼
spring: thymeleaf: mode: HTML datasource: url: jdbc:mysql://localhost:3306/demo1?useUnicode=true&characterEncoding=utf-8&serverTimezone=Asia/Shanghai username: root password: root jpa: hibernate: ddl-auto: update show-sql: truePo(實(shí)體)層代碼(User.java)
建立一個(gè)簡(jiǎn)單的用戶類,里面包含id主鍵(用jpa寫po層必須要有主鍵用@id注解)
@Entitypublic class User { @Id private Integer id; private String name; private String password; public Integer getId() {return id; } public void setId(Integer id) {this.id = id; } public String getName() {return name; } public void setName(String name) {this.name = name; } public String getPassword() {return password; } public void setPassword(String password) {this.password = password; } @Override public String toString() {return 'User{' +'id=' + id +', name=’' + name + ’’’ +', password=’' + password + ’’’ +’}’; }}Dao(數(shù)據(jù)庫(kù)操作)層代碼(UserDao.java)
創(chuàng)建一個(gè)接口繼承jpa的數(shù)據(jù)庫(kù)操作<>里第一個(gè)參數(shù),代表要操作的具體哪一個(gè)Po層,第二個(gè)參數(shù)代表這個(gè)Po層的主鍵類型寫了一個(gè)方法(也就是JPA最香的地方,可以通過簡(jiǎn)單的名字對(duì)應(yīng)關(guān)系進(jìn)行sql的查找)通過name和password查找一個(gè)用戶
public interface UserDao extends JpaRepository<User,Integer> { User findByNameAndPassword(String name,String password);}Service(服務(wù))層代碼
Service層接口(Userservice.java)
public interface UserService { User finduser(String name,String password);}
Service層具體實(shí)現(xiàn)(UserServiceimpl.java)
@Servicepublic class UserServiceImpl implements UserService { @Autowired UserDao userDao; @Override public User finduser(String name, String password) {return userDao.findByNameAndPassword(name,password); }}驗(yàn)證碼功能
因?yàn)橐玫搅蓑?yàn)證碼的實(shí)現(xiàn)功能,所以采取了一位大佬的驗(yàn)證碼生成的操作進(jìn)行集成它的工具類 VerifyCode.java以及CaptchaController.java本博客就不貼了,移步大佬博客進(jìn)行使用即可參考文章(關(guān)于驗(yàn)證碼)
Controller(控制)層代碼(LoginController.java)
@Controllerpublic class LoginController { @Autowired UserService userService; @RequestMapping('/') public String login() {return 'login'; } @RequestMapping('/dologin') public String dologin(User user, HttpSession session, String verifycode, Model model) {User user1=userService.finduser(user.getName(), user.getPassword());String code= (String) session.getAttribute('verifyCode');if(user1!=null&&code.equalsIgnoreCase(verifycode)){ model.addAttribute('message','成功'); return 'enter';}else{ model.addAttribute('message','失敗'); return 'enter';} }}
Html頁(yè)面代碼
注意三個(gè)input里面的name屬性,很多初學(xué)者(包括我)會(huì)好奇Controller是怎么獲取網(wǎng)頁(yè)上輸入的具體的值?實(shí)際上就是通過name屬性比如說(shuō)第一個(gè)參數(shù)user,因?yàn)樗锩嬗衭ser.name和user.password屬性,因此可以通過在html里進(jìn)行對(duì)name屬性的更改來(lái)實(shí)現(xiàn)數(shù)據(jù)的尋找,第二個(gè)參數(shù)verifycode也是一樣的道理注意驗(yàn)證碼后的input框的name屬性是verifycode,第三個(gè)屬性model也是常用屬性,此處是為了在頁(yè)面上進(jìn)行具體的消息顯示
public String dologin(User user, HttpSession session, String verifycode, Model model)
登錄頁(yè)面(login.html)
<!DOCTYPE html><html lang='en' xmlns:th='http://www.w3.org/1999/xhtml'><head> <meta charset='UTF-8'> <title>Title</title></head><body> <form action='/dologin'> <div> <span> 名字: </span> <input type='text' name='name' > </div> <div><span> 密碼:</span><input type='password' name='password' > </div> <div><span> 驗(yàn)證碼</span><input type='text' name='verifycode'> </div> <div><a href='javascript:void(0);' rel='external nofollow' > <img th:src='http://m.cgvv.com.cn/bcjs/@{getVerifyCode}' onclick='changeCode()' /></a> </div> <div> <button type='submit'>登錄</button> </div> </form> <script src='http://libs.baidu.com/jquery/2.0.0/jquery.min.js'></script> <script> function changeCode() { const src = 'http://m.cgvv.com.cn/getVerifyCode?' + new Date().getTime(); //加時(shí)間戳,防止瀏覽器利用緩存 $(’.verifyCode’).attr('src', src); } </script></body></html>
判斷登錄是否成功的頁(yè)面(enter.html)
通過Thymeleaf的表達(dá)式,對(duì)message進(jìn)行取值,來(lái)反應(yīng)登錄是否成功
model.addAttribute('message','成功');model.addAttribute('message','失敗');
<!DOCTYPE html><html lang='en' xmlns:th='http://www.w3.org/1999/xhtml'><head> <meta charset='UTF-8'> <title>Title</title></head><body> <h2 th:text='${message}'> 登錄成功 </h2></body></html>
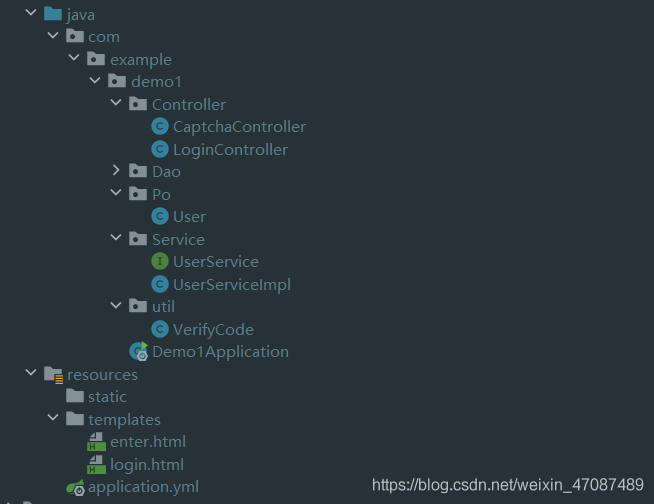
最后的項(xiàng)目目錄結(jié)構(gòu)
到此這篇關(guān)于Springboot+Thymeleaf+Jpa實(shí)現(xiàn)登錄功能(附源碼)的文章就介紹到這了,更多相關(guān)Springboot Thymeleaf Jpa登錄內(nèi)容請(qǐng)搜索好吧啦網(wǎng)以前的文章或繼續(xù)瀏覽下面的相關(guān)文章希望大家以后多多支持好吧啦網(wǎng)!
相關(guān)文章:
1. python如何換行輸出2. Python使用urlretrieve實(shí)現(xiàn)直接遠(yuǎn)程下載圖片的示例代碼3. Python:UserWarning:此模式具有匹配組。要實(shí)際獲得組,請(qǐng)使用str.extract4. Android Studio中一套代碼多渠道打包的實(shí)現(xiàn)方法5. Java 接口和抽象類的區(qū)別詳解6. python如何計(jì)算圓的面積7. Java使用Tesseract-Ocr識(shí)別數(shù)字8. Android打包篇:Android Studio將代碼打包成jar包教程9. 詳解java google Thumbnails 圖片處理10. 解決Android Studio 格式化 Format代碼快捷鍵問題
 網(wǎng)公網(wǎng)安備