springboot整合mybatis-plus逆向工程的實現(xiàn)
MyBatis-Plus(簡稱 MP)是一個 MyBatis 的增強工具,在 MyBatis 的基礎上只做增強不做改變,為簡化開發(fā)、提高效率而生。官方文檔
代碼生成器
AutoGenerator 是 MyBatis-Plus 的代碼生成器,通過 AutoGenerator 可以快速生成 Entity、Mapper、Mapper XML、Service、Controller 等各個模塊的代碼,極大的提升了開發(fā)效率。
mybatis-plus是根據(jù)數(shù)據(jù)庫表來生成對應的實體類,首先我們創(chuàng)建數(shù)據(jù)庫表User
id name age email 1 Jone 18 test1@baomidou.com 2 Jack 20 test2@baomidou.com 3 Tom 28 test3@baomidou.com 4 Sandy 21 test4@baomidou.com 5 Billie 24 test5@baomidou.com
其對應的數(shù)據(jù)庫 Schema 腳本如下:
DROP TABLE IF EXISTS user;CREATE TABLE user(id BIGINT(20) NOT NULL COMMENT ’主鍵ID’,name VARCHAR(30) NULL DEFAULT NULL COMMENT ’姓名’,age INT(11) NULL DEFAULT NULL COMMENT ’年齡’,email VARCHAR(50) NULL DEFAULT NULL COMMENT ’郵箱’,PRIMARY KEY (id));
其對應的數(shù)據(jù)庫 Data 腳本如下:
DELETE FROM user;INSERT INTO user (id, name, age, email) VALUES(1, ’Jone’, 18, ’test1@baomidou.com’),(2, ’Jack’, 20, ’test2@baomidou.com’),(3, ’Tom’, 28, ’test3@baomidou.com’),(4, ’Sandy’, 21, ’test4@baomidou.com’),(5, ’Billie’, 24, ’test5@baomidou.com’);
初始化springboot工程
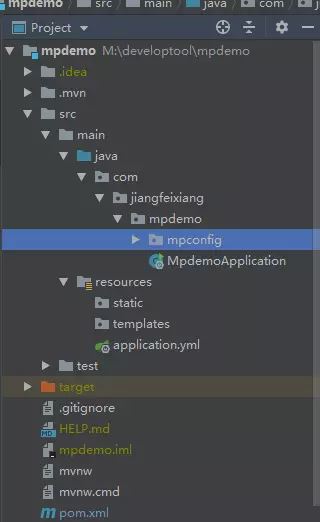
其中mpconfig就是我們逆向工程配置文件
基本依賴如下:
<dependencies> <dependency> <groupId>org.springframework.boot</groupId> <artifactId>spring-boot-starter-web</artifactId> </dependency> <dependency> <groupId>org.springframework.boot</groupId> <artifactId>spring-boot-starter-test</artifactId> <scope>test</scope> </dependency> <dependency> <groupId>mysql</groupId> <artifactId>mysql-connector-java</artifactId> <scope>runtime</scope> </dependency> <dependency> <groupId>org.projectlombok</groupId> <artifactId>lombok</artifactId> <optional>true</optional> </dependency> </dependencies>
下面開始引入逆向工程依賴
MyBatis-Plus 從 3.0.3 之后移除了代碼生成器與模板引擎的默認依賴,需要手動添加相關依賴:
<dependency> <groupId>com.baomidou</groupId> <artifactId>mybatis-plus-boot-starter</artifactId> <version>3.1.1</version> </dependency> <!--添加 代碼生成器 依賴--> <dependency> <groupId>com.baomidou</groupId> <artifactId>mybatis-plus-generator</artifactId> <version>3.1.1</version> </dependency>
添加 模板引擎 依賴,MyBatis-Plus 支持 Velocity(默認)、Freemarker、Beetl,用戶可以選擇自己熟悉的模板引擎,如果都不滿足您的要求,可以采用自定義模板引擎。
Velocity(默認):
<dependency> <groupId>org.apache.velocity</groupId> <artifactId>velocity-engine-core</artifactId> <version>2.1</version></dependency>
Freemarker:
<dependency> <groupId>org.freemarker</groupId> <artifactId>freemarker</artifactId> <version>2.3.28</version></dependency>
這里我選擇Freemarker注意!如果您選擇了非默認引擎,需要在 AutoGenerator 中 設置模板引擎
全部依賴如下:
<dependencies> <dependency> <groupId>org.springframework.boot</groupId> <artifactId>spring-boot-starter-web</artifactId> </dependency> <dependency> <groupId>org.springframework.boot</groupId> <artifactId>spring-boot-starter-test</artifactId> <scope>test</scope> </dependency> <!-- freemarker 模板引擎 --> <dependency> <groupId>org.freemarker</groupId> <artifactId>freemarker</artifactId> <version>2.3.23</version> </dependency> <dependency> <groupId>com.baomidou</groupId> <artifactId>mybatis-plus-boot-starter</artifactId> <version>3.1.1</version> </dependency> <!--添加 代碼生成器 依賴--> <dependency> <groupId>com.baomidou</groupId> <artifactId>mybatis-plus-generator</artifactId> <version>3.1.1</version> </dependency> <dependency> <groupId>org.projectlombok</groupId> <artifactId>lombok</artifactId> <optional>true</optional> </dependency> <dependency> <groupId>mysql</groupId> <artifactId>mysql-connector-java</artifactId> <scope>runtime</scope> </dependency> </dependencies>
下面開始:創(chuàng)建逆向工程配置類mpconfig
package com.jiangfeixiang.mpdemo.mpconfig;import com.baomidou.mybatisplus.annotation.DbType;import com.baomidou.mybatisplus.core.exceptions.MybatisPlusException;import com.baomidou.mybatisplus.core.toolkit.StringPool;import com.baomidou.mybatisplus.core.toolkit.StringUtils;import com.baomidou.mybatisplus.generator.AutoGenerator;import com.baomidou.mybatisplus.generator.InjectionConfig;import com.baomidou.mybatisplus.generator.config.*;import com.baomidou.mybatisplus.generator.config.converts.MySqlTypeConvert;import com.baomidou.mybatisplus.generator.config.po.TableInfo;import com.baomidou.mybatisplus.generator.config.rules.NamingStrategy;import com.baomidou.mybatisplus.generator.engine.FreemarkerTemplateEngine;import java.util.*;/** * @ProjectName: mybatis-plus * @Package: com.jiangfeixiang.mybatisplus.mpconfig * @ClassName: CodeGenerator * @Author: jiangfeixiang * @email: 1016767658@qq.com * @Description: 代碼生成器 * @Date: 2019/5/10/0010 21:41 */public class CodeGenerator { /** * 讀取控制臺內(nèi)容 */ public static String scanner(String tip) { Scanner scanner = new Scanner(System.in); StringBuilder help = new StringBuilder(); help.append('請輸入' + tip + ':'); System.out.println(help.toString()); if (scanner.hasNext()) { String ipt = scanner.next(); if (StringUtils.isNotEmpty(ipt)) { return ipt; } } throw new MybatisPlusException('請輸入正確的' + tip + '!'); } public static void main(String[] args) { /** * 代碼生成器 */ AutoGenerator mpg = new AutoGenerator(); /** * 全局配置 */ GlobalConfig globalConfig = new GlobalConfig(); //生成文件的輸出目錄 String projectPath = System.getProperty('user.dir'); globalConfig.setOutputDir(projectPath + '/src/main/java'); //Author設置作者 globalConfig.setAuthor('姜飛祥'); //是否覆蓋文件 globalConfig.setFileOverride(true); //生成后打開文件 globalConfig.setOpen(false); mpg.setGlobalConfig(globalConfig); /** * 數(shù)據(jù)源配置 */ DataSourceConfig dataSourceConfig = new DataSourceConfig(); // 數(shù)據(jù)庫類型,默認MYSQL dataSourceConfig.setDbType(DbType.MYSQL); //自定義數(shù)據(jù)類型轉(zhuǎn)換 dataSourceConfig.setTypeConvert(new MySqlTypeConvert()); dataSourceConfig.setUrl('jdbc:mysql://localhost:3306/mp?characterEncoding=utf-8&serverTimezone=GMT%2B8&useSSL=false'); dataSourceConfig.setDriverName('com.mysql.jdbc.Driver'); dataSourceConfig.setUsername('root'); dataSourceConfig.setPassword('1234'); mpg.setDataSource(dataSourceConfig); /** * 包配置 */ PackageConfig pc = new PackageConfig(); pc.setModuleName(scanner('模塊名')); //父包名。如果為空,將下面子包名必須寫全部, 否則就只需寫子包名 pc.setParent('com.jiangfeixiang.mpdemo'); mpg.setPackageInfo(pc); /** * 自定義配置 */ InjectionConfig cfg = new InjectionConfig() { @Override public void initMap() { // to do nothing } }; /** * 模板 */ //如果模板引擎是 freemarker String templatePath = '/templates/mapper.xml.ftl'; // 如果模板引擎是 velocity // String templatePath = '/templates/mapper.xml.vm'; /** * 自定義輸出配置 */ List<FileOutConfig> focList = new ArrayList<>(); // 自定義配置會被優(yōu)先輸出 focList.add(new FileOutConfig(templatePath) { @Override public String outputFile(TableInfo tableInfo) { // 自定義輸出文件名 , 如果你 Entity 設置了前后綴、此處注意 xml 的名稱會跟著發(fā)生變化!! return projectPath + '/src/main/resources/mapper/'+ pc.getModuleName() + '/' + tableInfo.getEntityName() + 'Mapper' + StringPool.DOT_XML; } }); cfg.setFileOutConfigList(focList); mpg.setCfg(cfg); /** * 配置模板 */ TemplateConfig templateConfig = new TemplateConfig(); // 配置自定義輸出模板 //指定自定義模板路徑,注意不要帶上.ftl/.vm, 會根據(jù)使用的模板引擎自動識別 // templateConfig.setEntity('templates/entity2.java'); // templateConfig.setService(); // templateConfig.setController(); templateConfig.setXml(null); mpg.setTemplate(templateConfig); /** * 策略配置 */ StrategyConfig strategy = new StrategyConfig(); //設置命名格式 strategy.setNaming(NamingStrategy.underline_to_camel); strategy.setColumnNaming(NamingStrategy.underline_to_camel); strategy.setInclude(scanner('表名,多個英文逗號分割').split(',')); //實體是否為lombok模型(默認 false) strategy.setEntityLombokModel(true); //生成 @RestController 控制器 strategy.setRestControllerStyle(true); //設置自定義繼承的Entity類全稱,帶包名 //strategy.setSuperEntityClass('com.jiangfeixiang.mpdemo.BaseEntity'); //設置自定義繼承的Controller類全稱,帶包名 //strategy.setSuperControllerClass('com.jiangfeixiang.mpdemo.BaseController'); //設置自定義基礎的Entity類,公共字段 strategy.setSuperEntityColumns('id'); //駝峰轉(zhuǎn)連字符 strategy.setControllerMappingHyphenStyle(true); //表名前綴 strategy.setTablePrefix(pc.getModuleName() + '_'); mpg.setStrategy(strategy); mpg.setTemplateEngine(new FreemarkerTemplateEngine()); mpg.execute(); }}
拆分詳解如下:
/** * 讀取控制臺內(nèi)容 */ public static String scanner(String tip) { Scanner scanner = new Scanner(System.in); StringBuilder help = new StringBuilder(); help.append('請輸入' + tip + ':'); System.out.println(help.toString()); if (scanner.hasNext()) { String ipt = scanner.next(); if (StringUtils.isNotEmpty(ipt)) { return ipt; } } throw new MybatisPlusException('請輸入正確的' + tip + '!'); }
讀取控制臺內(nèi)容無需更改,因為稍后啟動main方法只會需要在控制臺輸入模塊名以及數(shù)據(jù)庫表名。官網(wǎng)參考接下來是main方法,這個也是主程序,逆向工程啟動方法。下面看一下配置
AutoGenerator mpg = new AutoGenerator();
代碼生成器,所有的配置都需要set進去
全局配置:
GlobalConfig globalConfig = new GlobalConfig(); //生成文件的輸出目錄(下面兩行無需改動) String projectPath = System.getProperty('user.dir'); globalConfig.setOutputDir(projectPath + '/src/main/java'); //Author設置作者 globalConfig.setAuthor('姜飛祥'); //是否覆蓋文件 globalConfig.setFileOverride(true); //生成后打開文件 globalConfig.setOpen(false); //set進去代碼生成器對象中 mpg.setGlobalConfig(globalConfig);
數(shù)據(jù)源配置
DataSourceConfig dataSourceConfig = new DataSourceConfig(); // 數(shù)據(jù)庫類型,默認MYSQL dataSourceConfig.setDbType(DbType.MYSQL); //自定義數(shù)據(jù)類型轉(zhuǎn)換 dataSourceConfig.setTypeConvert(new MySqlTypeConvert()); //驅(qū)動,URL,用戶名以及密碼配置,這里使用的是mysql5.6版本 dataSourceConfig.setUrl('jdbc:mysql://localhost:3306/mp?characterEncoding=utf-8&serverTimezone=GMT%2B8&useSSL=false'); dataSourceConfig.setDriverName('com.mysql.jdbc.Driver'); dataSourceConfig.setUsername('root'); dataSourceConfig.setPassword('1234'); //set進去代碼生成器對象中 mpg.setDataSource(dataSourceConfig);
包配置
PackageConfig pc = new PackageConfig(); //這里的模塊名需要在控制臺輸入的,即生成的代碼在哪個包下 pc.setModuleName(scanner('模塊名')); //父包名。如果為空子包名必須寫全部, 否則就只需寫子包名 pc.setParent('com.jiangfeixiang.mpdemo'); //set進去代碼生成器對象中 mpg.setPackageInfo(pc);
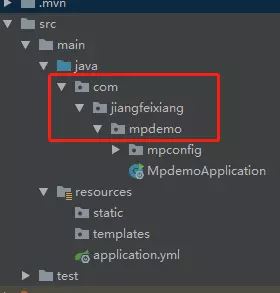
上面父包名是根據(jù)工程路徑來的,如下參考:
自定義配置
InjectionConfig cfg = new InjectionConfig() { @Override public void initMap() { // to do nothing } };
自定義輸出配置
String templatePath = '/templates/mapper.xml.ftl';List<FileOutConfig> focList = new ArrayList<>(); // 自定義配置會被優(yōu)先輸出 focList.add(new FileOutConfig(templatePath) { @Override public String outputFile(TableInfo tableInfo) { // 自定義輸出文件名 , 如果你 Entity 設置了前后綴、此處注意 xml 的名稱會跟著發(fā)生變化!! return projectPath + '/src/main/resources/mapper/'+ pc.getModuleName() + '/' + tableInfo.getEntityName() + 'Mapper' + StringPool.DOT_XML; } }); //這塊是set到上面自定義配置中 cfg.setFileOutConfigList(focList); //set進去代碼生成器對象中 mpg.setCfg(cfg);
最后是策略配置
StrategyConfig strategy = new StrategyConfig(); //設置命名格式 strategy.setNaming(NamingStrategy.underline_to_camel); strategy.setColumnNaming(NamingStrategy.underline_to_camel); strategy.setInclude(scanner('表名,多個英文逗號分割').split(',')); //實體是否為lombok模型(默認 false) strategy.setEntityLombokModel(true); //生成 @RestController 控制器 strategy.setRestControllerStyle(true); //設置自定義繼承的Entity類全稱,帶包名 //strategy.setSuperEntityClass('com.jiangfeixiang.mpdemo.BaseEntity'); //設置自定義繼承的Controller類全稱,帶包名 //strategy.setSuperControllerClass('com.jiangfeixiang.mpdemo.BaseController'); //設置自定義基礎的Entity類,公共字段 strategy.setSuperEntityColumns('id'); //駝峰轉(zhuǎn)連字符 strategy.setControllerMappingHyphenStyle(true); //表名前綴 strategy.setTablePrefix(pc.getModuleName() + '_'); mpg.setStrategy(strategy); mpg.setTemplateEngine(new FreemarkerTemplateEngine()); mpg.execute();
以上全部配置好之后直接啟動main方法,之后進入控制臺
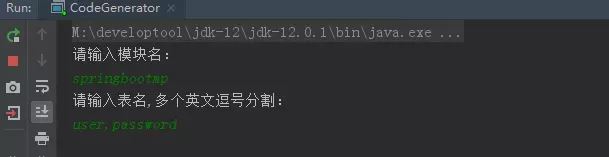
我的模塊名是springbootmp,因為我有兩張表,輸入兩個表的名稱回車即可生成對應的代碼,所生成的代碼在模塊名springbootmp下
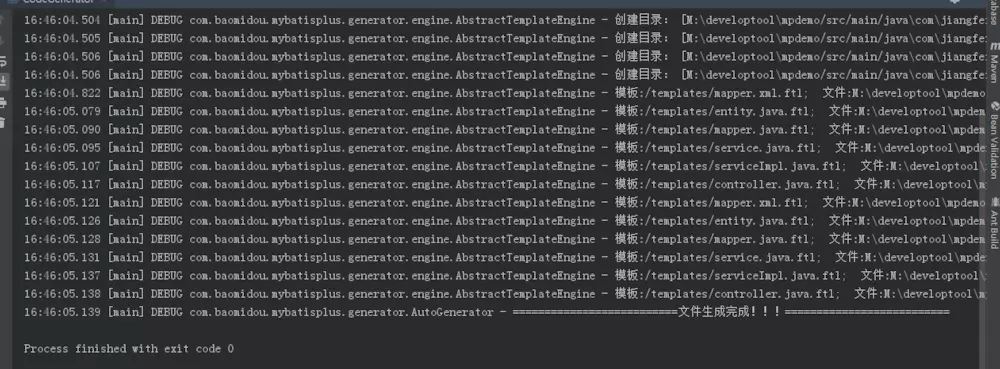
正確執(zhí)行控制臺輸出如下
然后看一下模塊:
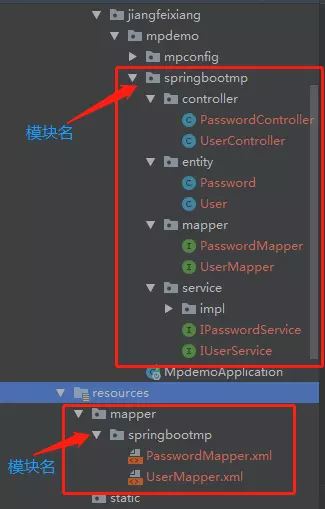
xxxmapper.xml文件是空的:

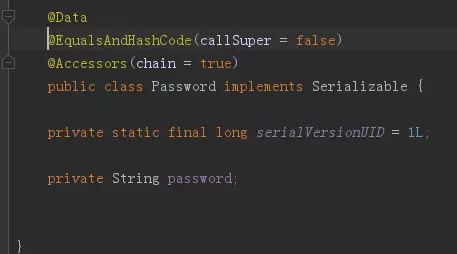
實體類已經(jīng)加上@Data注解省略了get/set方法并序列化
mapper接口繼承了BaseMapper

接口中沒有數(shù)據(jù)的增刪改查方法,那么我們直接在UserController類中注入IUserService接口,查詢所有user看看有沒有輸出:
@RestController@RequestMapping('/springbootmp/user')public class UserController { @Autowired private IUserService iUserService; /** * 獲取所有User * @return */ @RequestMapping('/getAllUser') public List<User> getAllUser(){ List<User> list = iUserService.list(); return list; }}
項目運行直接報錯如下:
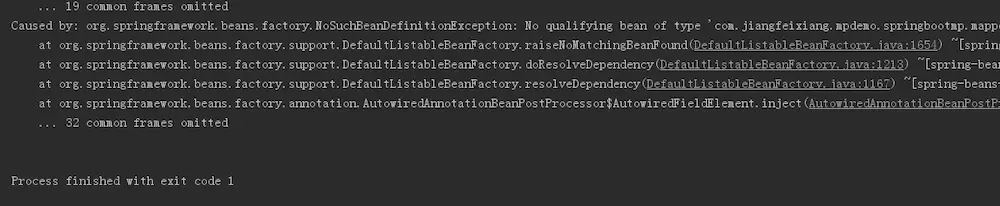
原因是因為主程序中沒有加入@MapperScan('com.jiangfeixiang.mpdemo.springbootmp.mapper')

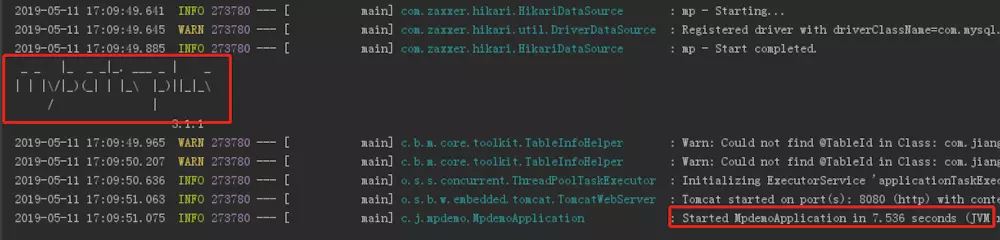
引入即可。之后重新運行啟動成功控制臺如下圖:
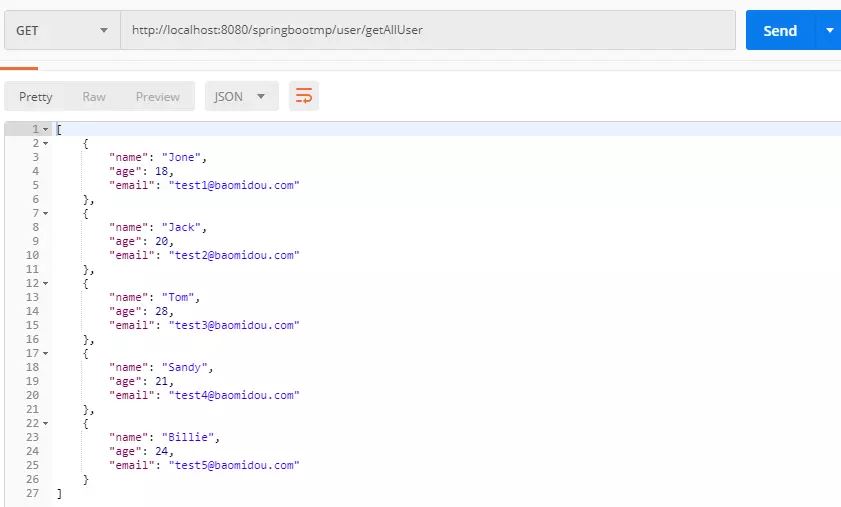
還有mybatisplus是不是很漂亮。調(diào)用接口測試如下
源碼
到此這篇關于springboot整合mybatis-plus逆向工程的實現(xiàn)的文章就介紹到這了,更多相關springboot mybatis-plus逆向工程內(nèi)容請搜索好吧啦網(wǎng)以前的文章或繼續(xù)瀏覽下面的相關文章希望大家以后多多支持好吧啦網(wǎng)!
相關文章:
1. XML入門的常見問題(三)2. HTTP協(xié)議常用的請求頭和響應頭響應詳解說明(學習)3. ASP將數(shù)字轉(zhuǎn)中文數(shù)字(大寫金額)的函數(shù)4. XML在語音合成中的應用5. .NET Framework各版本(.NET2.0 3.0 3.5 4.0)區(qū)別6. jscript與vbscript 操作XML元素屬性的代碼7. 不要在HTML中濫用div8. php使用正則驗證密碼字段的復雜強度原理詳細講解 原創(chuàng)9. ASP基礎入門第四篇(腳本變量、函數(shù)、過程和條件語句)10. HTML5實戰(zhàn)與剖析之觸摸事件(touchstart、touchmove和touchend)

 網(wǎng)公網(wǎng)安備